
Verify cold email lists using syntax, domain, MX, and SMTP checks to keep bounce rates under 1%. Route contacts to send, retry, enrich, or suppress based on verification status.
- Run verification checks in order: syntax, domain, MX, SMTP, then risk classification
- Keep hard bounce rates under 1% and pause campaigns above 2%
- Re-verify any email list older than 60 days before sending
- Suppress invalid, disposable, and spam trap addresses immediately
- Route catch-all and unknown addresses to separate retry workflows
- Use structured verification results to automate send decisions in your outreach stack
Email Verification for Cold Outreach: How to Catch Invalid Addresses Before Sending
If you verify your list before sending, you cut bounce risk fast. In cold outreach, I’d keep hard bounces at 1% or less, pause if they go above 2%, and stop if they hit 5%. That matters because B2B data decays by about 2.1% per month, and old or purchased lists often include 15% to 30% bad records.
Here’s the short version:
- I’d check emails in this order: syntax → domain → MX → SMTP → risk flags
- I’d send only to high-confidence valid addresses first
- I’d retry unknown results after 24–48 hours
- I’d suppress invalid, disposable, and trap addresses
- I’d treat catch-all and role-based emails with care
- I’d re-verify any list older than 60 days
This article explains how I’d turn raw verification results into simple actions: send, retry, enrich, or suppress. It also shows where standalone verifiers and built-in tools fit into a cold outreach workflow.
The Simple Way To Find Verified Emails For Cold Outreach [2026]
Run the core verification checks in order
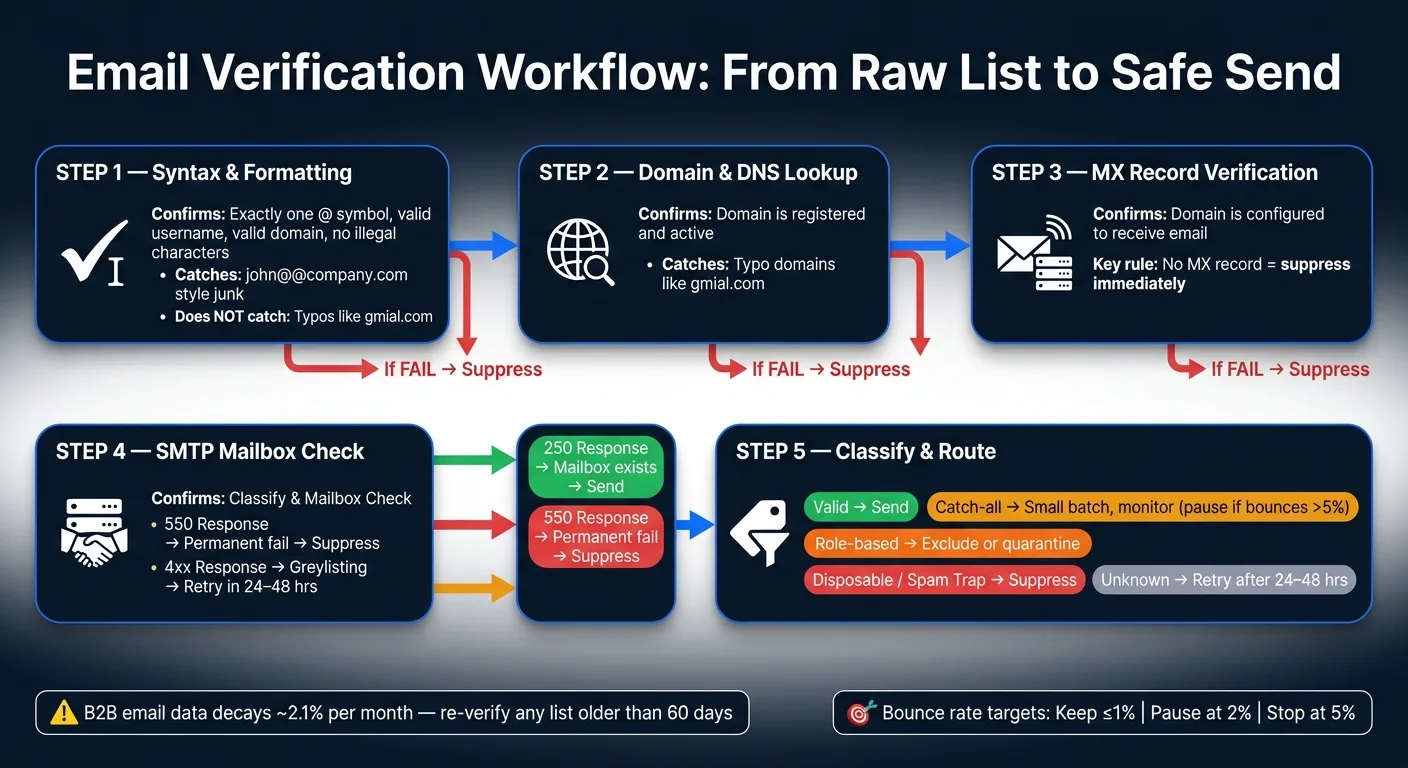
Use verification to catch invalid, risky, and low-quality addresses before they get anywhere near a send. The order matters: syntax, domain, MX, SMTP, then classification.
That flow helps you stop obvious bad data first, then move into deeper checks only when an address clears the earlier gates.
Start with syntax and formatting checks
Syntax validation is the fastest and lowest-cost check. It makes sure an address has:
- exactly one
@symbol - a username before the
@ - a valid domain after it
- no illegal characters or consecutive dots
This step catches obvious junk like john@@company.com before anything else runs.
What it doesn't do is tell you whether the domain or mailbox exists. An address like ceo@gmial.com looks fine from a formatting standpoint, so it passes syntax with no issue. That's why syntax is just the first gate, not the final answer.
Check the domain and MX records
Once syntax passes, check DNS to confirm the domain is real and active. This is where you catch typos like gmial.com that look fine on the surface but fail lookup.
Then move to the MX record check. This adds another layer: a domain can be live and registered but still not be set up to receive email.
If there's no MX record, mail can't be delivered there. Plain and simple. Any address tied to a domain with no MX record should be suppressed.
Run SMTP verification, then classify catch-all, role, and disposable addresses
SMTP verification is the most precise pre-send check. The tool connects to the mail server on port 25 and uses RCPT TO to test whether the mailbox accepts mail.
Here’s how to read the result:
- A
250response means the server would accept mail for that address. - A
550response is a permanent failure. The inbox doesn't exist and will hard bounce. - A
4xxresponse usually means the server is rejecting the connection for now, often because of greylisting, which is a temporary rejection tactic. In that case, the address should be retried later instead of being suppressed right away.
After SMTP, classify the address type. Treat these groups separately:
- Catch-all addresses are risky.
- Role inboxes are lower quality.
- Disposable or trap addresses should be suppressed.
Use the full set of results to route each contact into send, retry, enrich, or suppress.
| Check | What It Confirms | Key Limitation |
|---|---|---|
| Syntax | Correct formatting | Can't confirm the domain or inbox exists |
| Domain / DNS | Domain is registered and active | Can't confirm mail is configured |
| MX Record | Domain is set up to receive email | Can't confirm the specific inbox exists |
| SMTP | Specific inbox exists right now | Catch-all domains can return false positives |
The next step is turning each status into a sending decision.
Turn verification results into send, retry, enrich, or suppress decisions
Once verification is done, you’re left with raw statuses. That’s just the starting point. The next step is turning each status into a clear next move so nobody on your team has to guess.
Build a simple status-to-action framework
Give each verification result one action and stick to it.
| Verification Result | Action | Why |
|---|---|---|
| Valid | Send | Mailbox confirmed; lowest bounce risk |
| Invalid | Suppress | High risk of hard bounces |
| Disposable / Spam Trap | Suppress | Temporary inboxes expire quickly; spam traps can trigger blacklisting |
| Role-based | Exclude or quarantine | Shared inbox; low reply rate, higher complaints |
| Catch-all | Small batch, monitor closely | Mailbox existence unconfirmed |
| Unknown | Retry after 24–48 hours | Often a temporary server issue or greylisting |
Use enrich only for borderline records that are worth checking against a second data source.
Keep risky records out of your first sends
If you’re sending from new mailboxes or domains that are still building sender reputation, keep your first wave tight. Only high-confidence valid addresses should go out early.
Hold back catch-all and unknown records until the domain shows a clean sending history. If you decide to test catch-all addresses later, run them in a separate campaign. Set a hard stop rule: if bounce rates in that segment go above 5%, pause the rest of the records right away.
That kind of separation matters. A risky segment can drag down results for everything else if you mix it in too soon.
Re-verify older lists before reuse
B2B email data decays at roughly 2.1% per month. That may not sound like much, but it adds up fast. A stale list can cross bounce thresholds that get providers paying attention for the wrong reasons.
A simple rule works well here:
- Re-verify lists older than 60 days
- Re-verify right away if the last campaign on that list had a bounce rate above 1%
Old data has a way of looking fine on paper and failing the moment you hit send. A quick re-check helps you avoid that mess.
Pick verification tools and fit them into your outbound stack
What to look for in a verifier for cold outreach
Once you understand the verification logic, the next step is picking tools that pass those results into your stack in a clean, usable way.
Choose a verifier that returns actionable status data for each contact. Catch-all detection and greylisting retries matter a lot here, because both can create false positives and false negatives.
On the output side, look for structured statuses instead of simple pass/fail labels. A result like is_catchall: true or a confidence score from 0 to 100 gives your automation clear signals to work with. You’ll also want API access for real-time verification at lead capture, bulk processing for list cleaning, and webhook support so results can flow straight into your CRM without manual exports.
It also helps to look closely at how a tool handles Microsoft 365 and Google Workspace domains. That detail can make a big difference in day-to-day outbound work.
The next call is simple: should that logic live in a separate verifier, or inside your sending platform?
Standalone verifiers vs. built-in verification in outreach platforms
The choice between a standalone verifier and one built into your sending platform mostly depends on where your data sits and how fast it needs to move.
Standalone tools like ZeroBounce or NeverBounce work well for cleaning large legacy databases, purchased lists, or CRM exports. They run deep SMTP checks and usually deal with edge cases better. The tradeoff is friction in the workflow. You export a CSV, upload it, wait, download the results, and then re-import everything into your sending tool.
That gap between verification and sending isn’t small. The longer you wait after cleaning, the more your list quality slips.
Built-in verification inside platforms like Instantly removes that lag by verifying contacts when they’re enriched or added to a sequence. There’s no export/import loop, and the results can feed straight into routing logic. Built-in options are faster, but they’re often less detailed when edge cases show up.
| Tool Type | Checks Covered | API Support | Where Verification Happens | Best Fit |
|---|---|---|---|---|
| Standalone (e.g., ZeroBounce, NeverBounce) | Deep: syntax, MX, SMTP, catch-all, disposable, spam traps | Yes | Before import, via CSV or API | Cleaning legacy, purchased, or CRM lists |
| Built-in (e.g., Instantly) | Moderate: focused on deliverability for active sends | Varies | Inside the platform at enrichment or send time | Active outbound teams wanting fewer tools |
| Infrastructure-first (e.g., OutreachFox) | Full stack: verification, mailbox provisioning, warmup | Yes, API-first | At enrichment and before sequence entry | Agencies, multi-client workspaces, ops-heavy GTM teams |
Where OutreachFox fits in a verification-first workflow

For teams that want verification enforced inside the workflow, infrastructure-first platforms remove the handoff between cleaning and sending.
OutreachFox combines verification, mailbox provisioning, and warmup in one workflow. Verification runs during enrichment, so unverified contacts never make it into sequences. For agencies managing multiple client workspaces, verification can be enforced from one place.
Because the core is API-first, verification results and mailbox-health events can push out in real time through webhooks, with no manual syncing required.
Conclusion: Make pre-send verification a standard step, not a one-time task
This only works when verification becomes a routine check before every send.
Run it in the same order each time: syntax, domain/MX, SMTP, then classification. Each step catches records the step before it can't confirm, so the process stays clean and consistent.
If a list is more than 60 days old, verify it again within 24–48 hours of launch. That window helps keep stale records out of launch-day sends.
Bounce rates above 2% can draw provider scrutiny and may take weeks to repair.
Treat pre-send verification as a standard launch step, not a last-minute cleanup job. It belongs on every launch checklist.
Frequently asked questions
Why does the article recommend keeping hard bounce rates at 1% or less for cold outreach?+
Because B2B data decays at about 2.1% per month, and bounce rates above 2% can draw provider scrutiny that may take weeks to repair. The article suggests pausing if bounces exceed 2% and stopping completely at 5% to protect sender reputation.
What's the difference between syntax validation and SMTP verification?+
Syntax validation only checks if an email is correctly formatted (one @ symbol, valid characters, proper structure), while SMTP verification connects to the actual mail server to test if the specific mailbox exists and can receive mail. An address can pass syntax but fail SMTP if the inbox doesn't exist.
Why should catch-all addresses be treated differently than verified valid addresses?+
Catch-all domains accept mail for any username, so SMTP verification can't confirm whether the specific inbox actually exists. The article recommends sending catch-all addresses in small separate batches with close monitoring, and pausing if bounce rates exceed 5% in that segment.
When should you re-verify an email list according to this article?+
You should re-verify any list older than 60 days, or immediately if the last campaign on that list had a bounce rate above 1%. This is necessary because B2B email data decays at roughly 2.1% per month.
What does a 4xx SMTP response mean during verification?+
A 4xx response is usually a temporary rejection, often due to greylisting tactics by the mail server. The article recommends retrying these addresses after 24-48 hours instead of suppressing them immediately, since they may be valid but temporarily unavailable.
How does built-in verification in outreach platforms differ from standalone verification tools?+
Built-in verification happens inside the sending platform at enrichment or send time with no export/import workflow, making it faster but sometimes less detailed with edge cases. Standalone tools offer deeper SMTP checks but require exporting, uploading, waiting, and re-importing data, creating lag between verification and sending.
What verification checks should be run and in what order?+
The article recommends this order: syntax first to catch formatting errors, then domain/DNS to confirm the domain exists, then MX records to verify mail configuration, then SMTP to test the specific mailbox, and finally classification to identify catch-all, role-based, disposable, or trap addresses.