
Google Postmaster Tools measures Gmail reputation through domain verification, authentication checks, and spam rate monitoring. Keep spam below 0.1%, maintain 99%+ authentication rates, and review metrics weekly to protect deliverability.
- Verify the exact sending domain or subdomain, not just your main site domain
- Keep spam rate below 0.1% and authentication pass rates at 99% or higher
- Separate cold outreach, transactional, and product email on different subdomains
- Monitor domain reputation, IP reputation, and spam rate together every week
- Recovery from reputation damage typically takes 6 to 10 weeks of clean sending
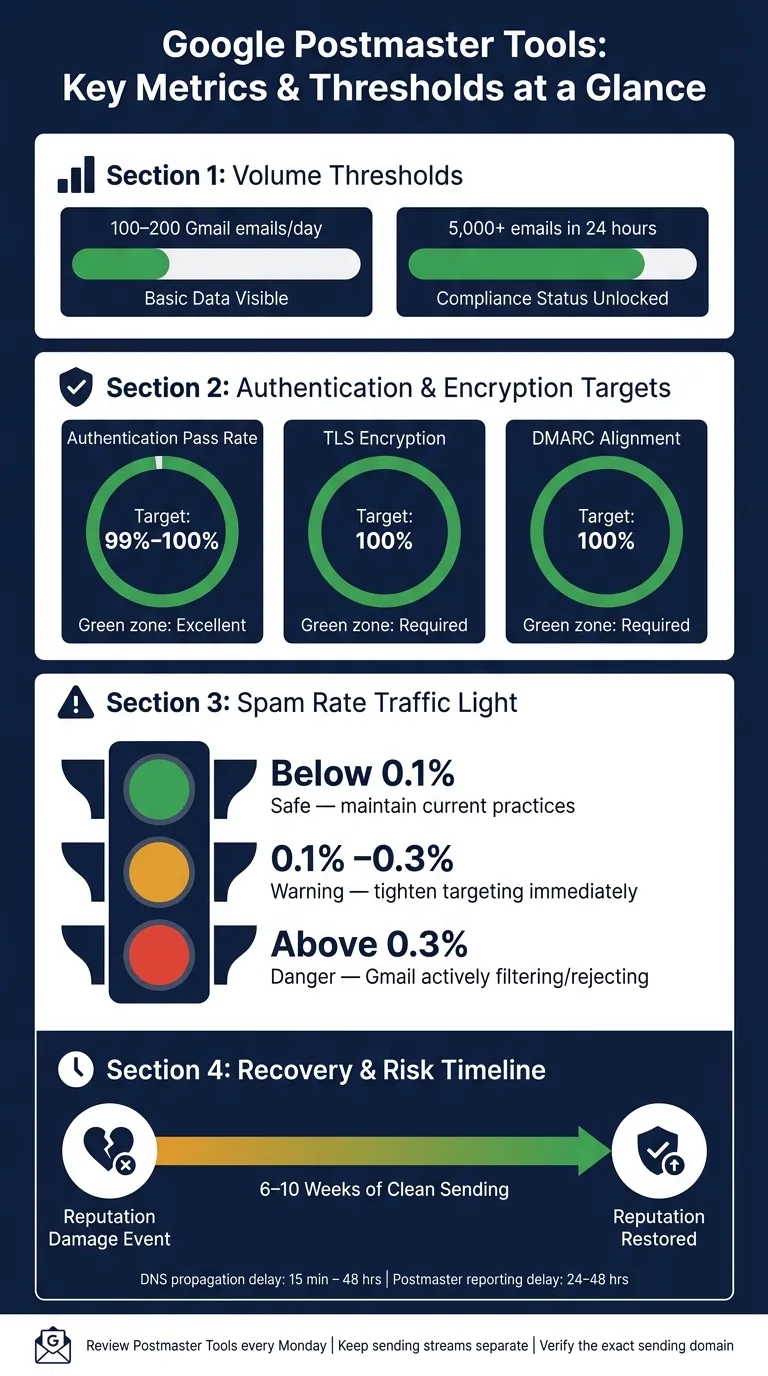
- Need 100 to 200 Gmail emails daily for basic data and 5,000+ for compliance status
Google Postmaster Tools Setup for High Reputation
If I want Gmail to trust my email, I need three things first: the right sending domain, working SPF/DKIM/DMARC, and enough Gmail volume to show data. Google Postmaster Tools helps me measure Gmail reputation, spam complaints, authentication status, and compliance. It does not fix setup problems for me.
Here’s the short version:
- I verify the exact domain or subdomain that sends mail
- I publish the TXT verification record in DNS
- I check SPF, DKIM, and DMARC alignment before sending
- I keep cold outreach, transactional, and product email on separate subdomains
- I watch spam rate, domain reputation, authentication, and compliance
- I remember there is a 24–48 hour delay in reporting
- I need about 100–200 Gmail emails/day for basic data, and about 5,000+ in 24 hours for Compliance Status
- I treat 0.1% spam rate as the ceiling, and 0.3% as danger
A few numbers matter most:
- Authentication pass rate: aim for 99%–100%
- TLS encryption: aim for 100%
- Spam rate: keep it below 0.1%
- Recovery after reputation damage: often 6–10 weeks
The main idea is simple: verify the right domain, keep sending streams separate, send steadily, and review Postmaster every week. That gives me a clean view of how Gmail sees my mail and helps me catch problems before Gmail starts filtering or rejecting messages.
How To Set Up Google Postmaster Tools
Set Up Google Postmaster Tools and Verify Your Sending Domain
Start by adding the domain Gmail should judge, publish the TXT record, and then verify ownership. Go to postmaster.google.com, sign in with a Google or Google Workspace account, and click "+" to add your domain.
After the domain shows as verified, move on to domain grouping and authentication checks before you send anything.
Add the Right Domain in Postmaster Tools
Add the exact sending domain, not just your main site domain. In practice, that means the domain in your DKIM d= tag or your SPF Return-Path.
For example, if you send cold email from outreach.example.com, verify that subdomain on its own. That way, the data matches that sending stream instead of your main site domain. Each verified domain has its own data.
A simple rule: use one Postmaster entry per active sending subdomain so weekly reputation data stays clean.
Publish the TXT Verification Record in DNS
After you enter your domain, Postmaster Tools gives you a one-of-a-kind google-site-verification=... string. Copy the TXT value exactly as shown. No extra spaces. No broken quotes.
Then add it in your DNS as a TXT record at the root host (@).
Before you click verify, check that the TXT record is live with dig +short txt yourdomain.com. DNS propagation usually takes 15–60 minutes, but some providers may take up to 48 hours.
If verification fails even after the record is live, generate a new verification string in Postmaster Tools, replace the old TXT record in DNS, and try again.
Confirm Ownership and Grant Team Access
Once you click Verify and see the verified status, the domain becomes active in your dashboard.
If other people need access, go to More > Manage next to the verified domain and add their Google account email addresses. Access only applies to that one verified domain, so you'll need to repeat the process for each domain you want to track on its own.
After verification, group domains by sending stream and check SPF, DKIM, and DMARC alignment before sending.
Organize Domains and Check Authentication Before Sending
Keep Domains Grouped or Separate Based on Sending Stream
Put cold outreach, transactional email, and product email on separate domains or subdomains. That way, each sending stream stands on its own, and your Postmaster data stays clean and easier to read.
Verify every active sending subdomain on its own. If one stream runs into trouble, you’ll spot it faster instead of digging through mixed signals.
Use Feedback-ID to trace issues inside each separate stream.
Once those streams are split, check SPF, DKIM, and DMARC on each one before you send anything.
Check SPF, DKIM, and DMARC Alignment
Check SPF, DKIM, and DMARC alignment before sending. DMARC alignment fails when the visible From domain does not match the SPF Return-Path or DKIM d= domain. This is where teams often get tripped up: one tool changes the From address, another sets a different Return-Path, and suddenly mail that looked fine on the surface stops lining up.
Audit any CRM, helpdesk, or sending tool that rewrites the From, Return-Path, or DKIM domain.
After authentication is clean, ramp new domains slowly to protect reputation.
Use Pre-Warmed Mailboxes and Slow Volume Ramps on New Domains
A fresh domain has zero sending history with Gmail. So don’t blast out volume on day one. Start with a low daily send count, then increase it bit by bit over days and weeks.
Sudden spikes can trigger throttling and reputation loss. And if a domain’s reputation gets damaged, recovery can take 6–10 weeks of clean sending. That’s a long timeout for something that’s easy to avoid.
Use pre-warmed mailboxes where possible to shorten the ramp window and cut the risk of overloading a new domain before reputation is established.
Monitor the Right Postmaster Signals Each Week
Read Domain Reputation, IP Reputation, and Spam Rate Together
Once verification is done, use these signals to spot drift before Gmail makes it a bigger issue. Don’t read them in isolation. Domain reputation shows how much Gmail trusts your authenticated sending domain. IP reputation shows trust in the sending IP. Spam rate shows how many recipients are actively marking your messages as junk.
What matters most is the pattern across all three. A low spam rate with a drop in domain reputation is a warning sign. In most cases, that means Gmail is filtering messages before users even get the chance to complain.
| Signal | What it means | What a decline usually points to |
|---|---|---|
| Domain reputation | Gmail's trust in the authenticated sending domain | Poor list quality, sudden volume shifts, weak engagement, or rising complaints |
| IP reputation | Gmail's trust in the sending IP address | Other senders on the same IP, abrupt sending spikes, or poor traffic quality |
| Spam rate | The share of messages marked as spam by users | Targeting problems, message mismatch, or aggressive sending |
Pay attention to week-over-week movement, not just fixed thresholds.
If reputation drops, check authentication first. Then look at list quality or volume.
Review Authentication, Encryption, and Delivery Errors
The Authentication and Encryption panels should stay at 99% or higher. If SPF, DKIM, or DMARC drops below a 99% pass rate, dig into it right away. TLS encryption should stay at 100%. If that drops, the issue usually sits in your sending setup, not in list quality.
Check these panels after any DNS change, mailbox migration, or campaign launch. Then review Delivery Errors for rate limits, spam filtering, and delivery failures.
Write down any failures so you can line them up with the next weekly review.
Build a Simple Monitoring Workflow for Teams
Review Postmaster once a week. Open the dashboard every Monday morning. Monday gives you a clean look at the prior week, which makes trend spotting much easier.
Compare spam rate changes week over week. If the rate moves from 0.05% to 0.08%, it may still look safe on paper, but it’s still a signal to tighten targeting before things slide. If spam rate goes past 0.3%, pause the lowest-performing campaigns first, cut total volume by about 50%, and remove recipients who haven’t engaged in the last 30–60 days.
Log every infrastructure change with a date. For example:
07/02/2026: Switched to new SMTP provider
For agencies handling multiple domains, this log is a must. Without it, a reputation drop can seem random when it actually lines up with a recent DNS change or provider migration.
If a metric moves, trace it back to the last DNS, mailbox, or campaign change.
Fix Common Setup Problems and Maintain High Reputation
Solve the Setup Errors That Block Data Collection
If verification worked but Postmaster still shows no data, start with the usual suspects: low Gmail volume, the wrong domain, or DNS propagation delays.
If you send from a subdomain, make sure that exact subdomain is the one added in Postmaster. This trips people up all the time. The problem is often a mismatch between the domain you verified and the domain that’s doing the sending. Check the authenticated sending domain for that stream, not just the visible From address.
DNS can slow things down too. Even when records look live on your end, Postmaster may not show data right away. Give DNS time to finish propagating before you assume something is broken. Also, very low volume can keep reports from appearing at all.
Use this table to match each symptom with the fastest fix:
| Issue | Most Likely Cause | Fix |
|---|---|---|
| No data after verification | Too little Gmail volume or wrong domain verified | Verify the exact sending domain; increase sends to personal Gmail accounts |
| No data after propagation window | DNS not fully resolved | Check TXT record is published correctly |
| Authentication dips below 99% | Malformed SPF/DKIM or recent DNS change | Audit DNS records; check third-party senders and DMARC alignment |
| Compliance Status shows "Needs Work" | Missing one-click unsubscribe or DMARC failure | Add List-Unsubscribe and List-Unsubscribe-Post; fix DMARC alignment |
Once data starts showing up, the next job is keeping it clean. Steady volume and separate sending streams make a big difference.
Maintain Sender Reputation After Setup Is Complete
Sender reputation isn’t a one-time setup task. You have to watch it week after week. Authentication alignment, steady sending volume, and clean lists all need regular checks.
One sharp jump in volume can hurt you fast. A sudden 5x spike in daily sends can lead to throttling and reputation drops. If you're warming up a new domain, add volume bit by bit each week instead of flooding Gmail all at once.
It also helps to split your mail by purpose. Use separate subdomains for separate streams, such as marketing.domain.com and transactional.domain.com. That way, if one stream gets a burst of complaints, it won’t drag the other one down with it.
List quality is where many senders get burned. Keep spam rate below 0.1%. If it starts moving toward 0.3%, Gmail begins active filtering and rejection. When complaints go up, use the Feedback-ID header to pinpoint the campaign or audience segment behind the problem. If reputation takes a major hit, recovery usually takes 6–10 weeks of clean sending.
The full workflow matters: verified authentication, correct domain setup, separated streams, and weekly Postmaster reviews. That’s what keeps Gmail reputation steady over time. The final section ties these steps together into a repeatable sequence.
Frequently asked questions
How much email volume do I need before Google Postmaster Tools shows any data?+
You need approximately 100–200 Gmail emails per day for basic data to appear in Google Postmaster Tools. For Compliance Status specifically, you'll need about 5,000+ emails sent to Gmail addresses within a 24-hour period. Keep in mind there's also a 24–48 hour reporting delay after your sending volume reaches these thresholds.
Should I verify my main domain or my sending subdomain in Postmaster Tools?+
You should verify the exact domain or subdomain that actually sends your email, which matches your DKIM d= tag or SPF Return-Path. If you send cold email from outreach.example.com, verify that specific subdomain rather than your main site domain. This ensures the reputation data reflects that particular sending stream accurately.
What spam rate threshold should I stay under to avoid Gmail filtering?+
Keep your spam rate below 0.1% as the operational ceiling. If your spam rate approaches 0.3%, you're in the danger zone where Gmail actively starts filtering or rejecting messages. Even smaller increases, like moving from 0.05% to 0.08%, should prompt you to tighten targeting before the situation worsens.
How long does it take to recover from reputation damage in Google Postmaster Tools?+
Recovery after significant reputation damage typically takes 6–10 weeks of consistent, clean sending. This is why prevention through gradual volume ramps and proper list hygiene is so important—the timeout period for fixing reputation problems is substantially longer than the time it takes to cause them.
Why would my Postmaster Tools show no data even after successful domain verification?+
The most common causes are insufficient Gmail volume, verifying the wrong domain (your main site instead of your actual sending subdomain), or DNS propagation delays. Check that you verified the exact authenticated sending domain for your mail stream, ensure you're sending at least 100–200 emails per day to Gmail addresses, and allow up to 48 hours for DNS records to fully propagate.
What authentication pass rate should I target in Google Postmaster Tools?+
Aim for a 99%–100% authentication pass rate for SPF, DKIM, and DMARC. TLS encryption should be at 100%. If your authentication drops below 99%, investigate immediately as this typically indicates DNS configuration issues, third-party sender problems, or DMARC alignment failures that need urgent correction.
Why should I use separate subdomains for different email types?+
Separating cold outreach, transactional email, and product email onto different subdomains keeps each sending stream independent. If one stream encounters reputation problems or complaint spikes, it won't damage the reputation of your other email types. This separation also makes Postmaster data clearer and helps you identify issues faster within specific campaigns.